Docker Essentials: Managing Dependencies With Ease
A Gentle Introduction to a Popular Container Solution
Introduction
Docker is still one of the most commonly used container solutions in the world. But what is a container? Why do you need them? In this article, we will answer these questions and learn the basic concepts of Docker, too. Whether you already worked with Docker or barely heard of it before, this articles is right for you!
Info
The source code used in this article can be found on GitHub.
What Is a Container?
You can think of a software container as a container in the real world. The idea is to put your application and its dependencies inside of an encapsulated container. This way, you isolate the application from other applications on your host system. While this may not seem beneficial for a moment, the isolation of dependencies is a strong feature. Hence, it is also one of the major reasons for using containers.
Imagine you had two applications. Both have various third-party libraries they depend upon. However, both share a common dependency. The problem? They depend on different versions of the same library!
Different programming languages and frameworks have various solutions for this kind of problem, but there are cases where such a solution does not exist out-of-the-box. Welcome to the world of containers, where you achieve exactly that!
But this is not the only advantage of containers, though one of the major ones. Furthermore, you can scale containers easily. Do you have a website, which gets a bunch of requests, is optimised in many ways but still cannot handle all these requests? Spawn a second container, so (roughly) twice as much requests can be handled!
There are other advantages, too, but let's focus on the dependency-part.
Container vs. Virtual Machine
If you are already familiar or at least heard of virtual machines, you may ask: Why don't we use a virtual machine here instead? The answer is short and simple: Virtual machines come with too much overhead and try to solve a different problem. While containers are used to isolate and bundle an application with all its dependencies, virtual machines are used to isolate a whole operating system.
Consequently, starting containers is much faster than starting virtual machines. In the first case, you only start an application, whereas, in the other scenario, a whole operating system is started. The following picture visualises the difference between virtual machines and containers pretty well.
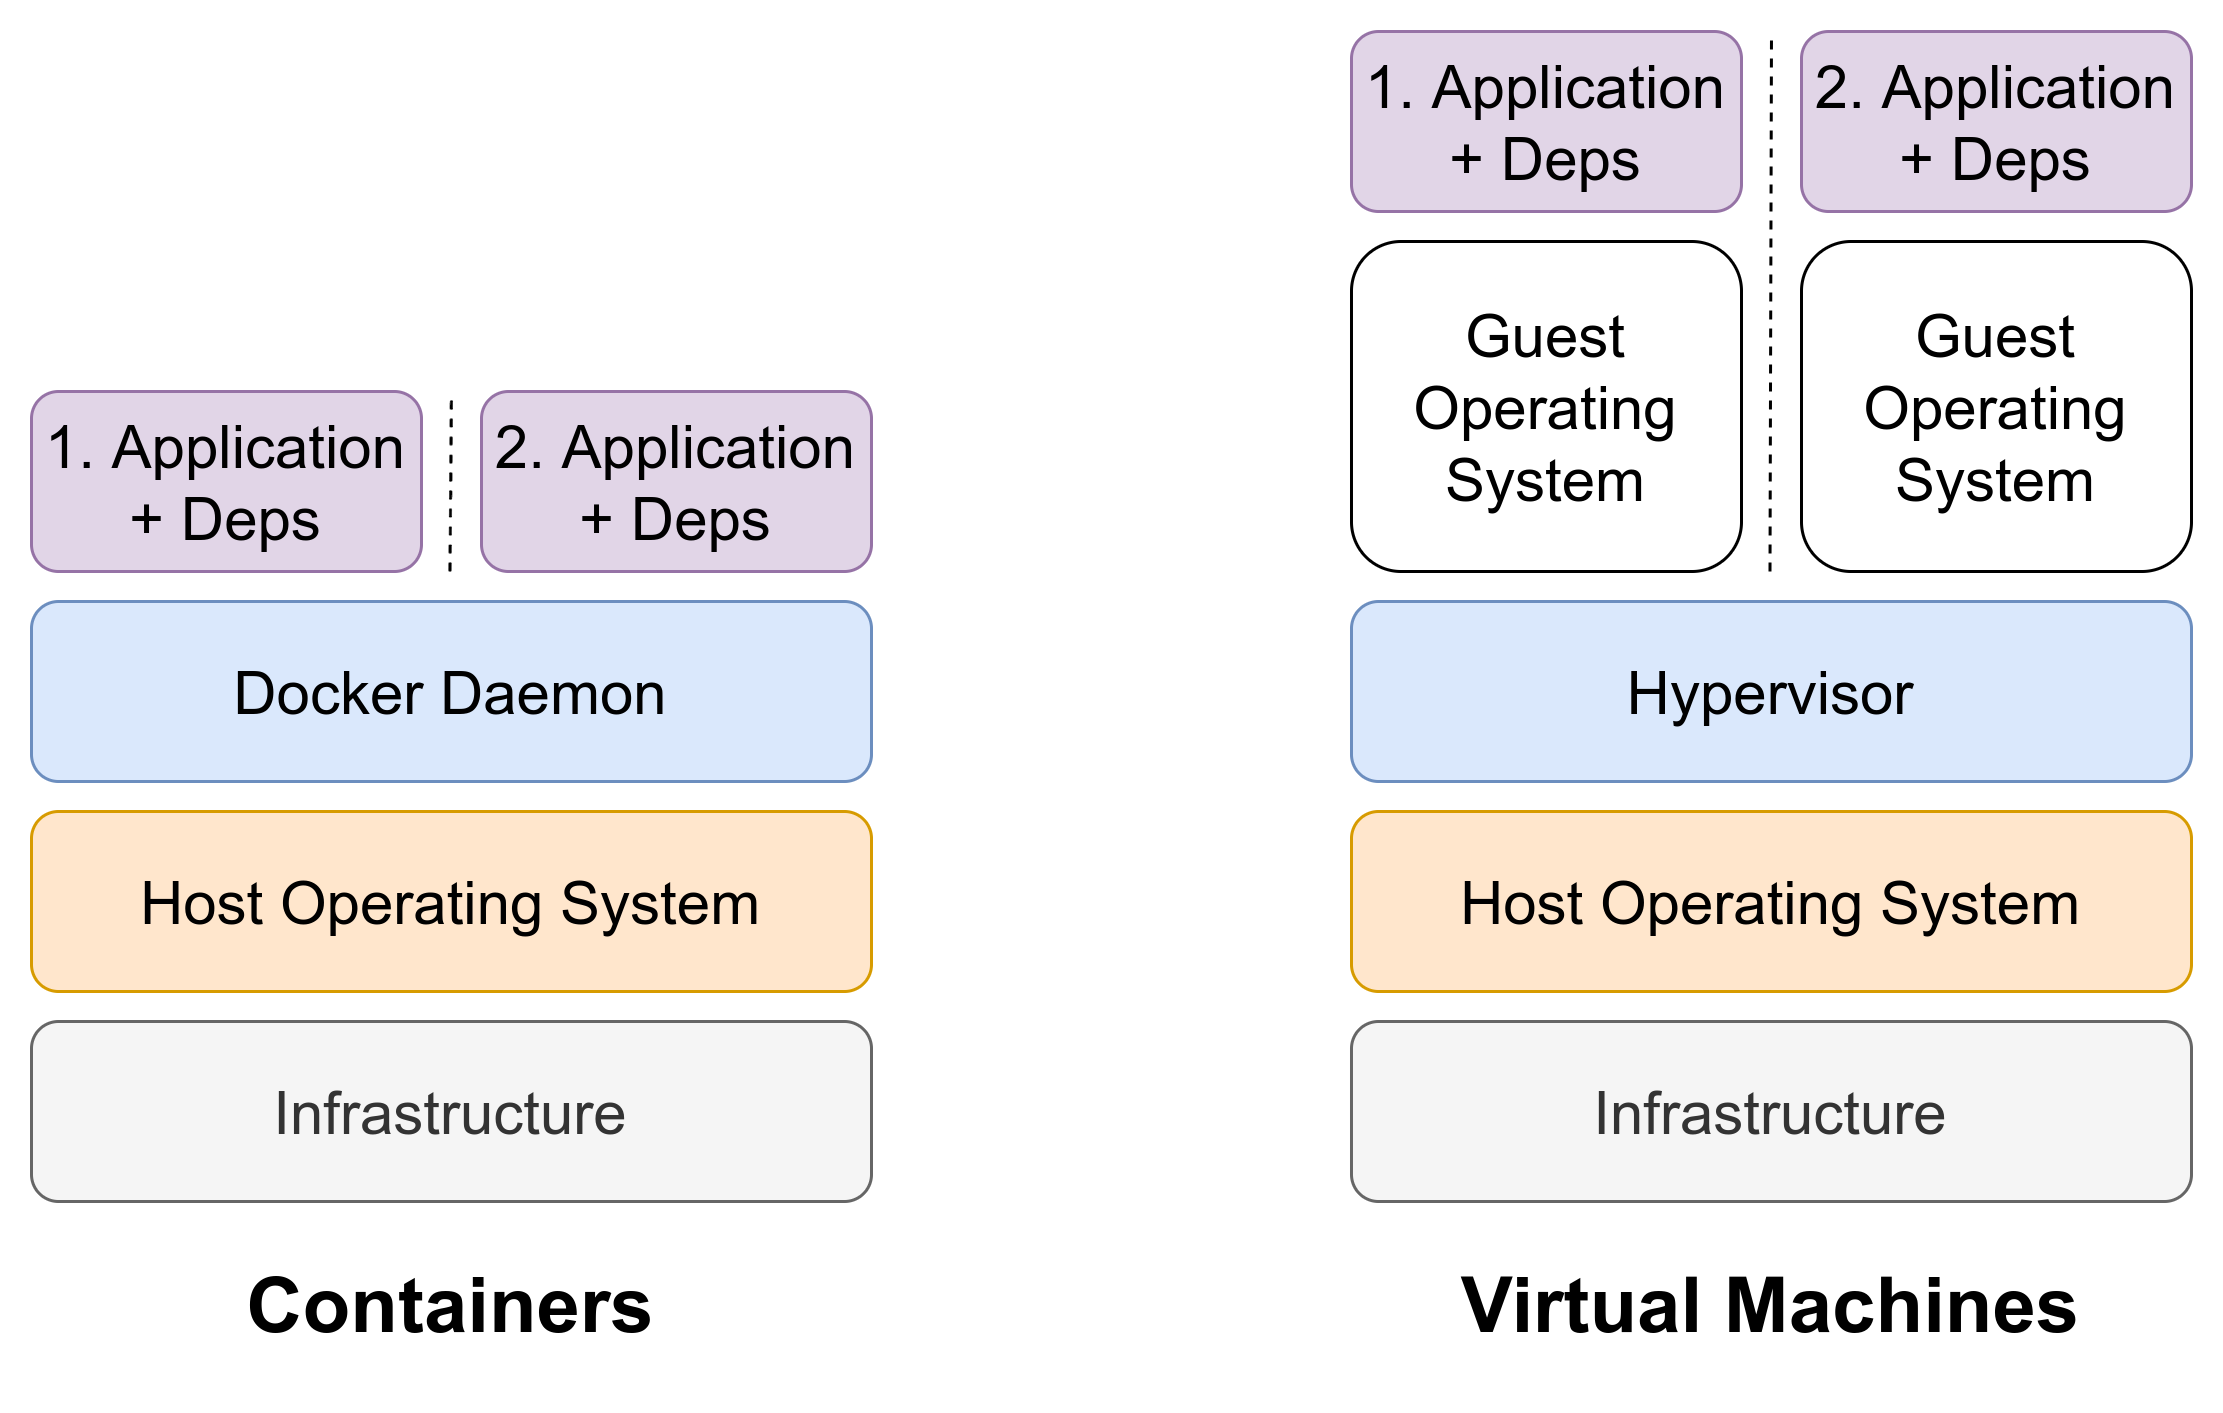
As you can see, containers get rid of the guest operating system. They leverage operating system functionalities from the host operating system. The Docker daemon is responsible for this part and is pretty similar to the hypervisor.
After distinguishing containers and virtual machines, let's have a look at Docker specific components.
Docker Architecture
The following picture is from Docker's official documentation and illustrates the general architecture of Docker.
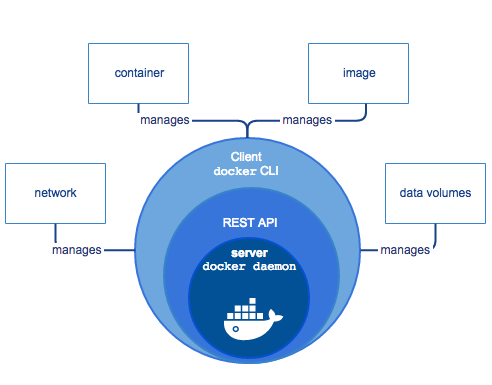
The inner part consists of the earlier mentioned Docker daemon. It is the core component, which provides functionalities to isolate containers, let them communicate, and more.
The two outer circles are the REST API and a command-line interface (CLI) client. The REST API can be used by other programs to talk to the Docker daemon. The CLI client is meant to be used by humans to interact with the daemon. We will use the CLI later.
The CLI let us manage different Docker artefacts. But before we have a look at them, let's start with the Dockerfile!
Dockerfile
The Dockerfile contains instructions to build a Docker image. It can be seen as a recipe. Suppose you want to bake a cake. Usually, you do it based on a recipe. The recipe contains information about the ingredients you need, their quantities as well as when and how to use them.
However, using different kinds of flour (or different brands) may result in slightly different cakes. It is not guaranteed that you will have the same cake in the end in every case. This is true for Dockerfiles, too. Building Docker images in different environments may result in slightly different images.
At this point, we do not care about these slight differences. For us, it is important to be able to share Dockerfiles with our application with other people and different systems. If our application arrives at the targeted system - the one where it will finally run - it is time to build an actual image!
Image
A Docker image can be seen as a read-only template to create a Docker container. You create an image in your target system based on a Dockerfile. Based on the image, several identical containers can be created.
Typically, a custom Docker image is based on another image. For instance, if you have a Flask application (Python web framework), you want to have an environment where Python is already installed. Therefore, you can use an already existing base image.
Note
You will see a practical example later.
Container
The last step in containerising your application involves creating an actual container. As stated earlier, containers are created based on a Docker image. They are runnable instances of an image, which you can interact with.
Usually, a container is isolated from other containers. And this is good: We want them to be isolated to solve our dependency issue. However, sometimes it is good that containers can communicate with each other - at least to a certain extend.
Think of the following situation: You have a web application running in one container and you want to have a second container, which contains the database used by the web application. To make sure they are allowed to talk to each other, they need to be in the same network.
We will not cover networks in this article. For the example at the end, we will make sure that all our containers will share the same default network. More on that later.
Volumes
The final concept I want to cover is volumes. Containers are ephemeral. This means that after you remove a container and spawn a new one, changes will be lost. Let's take an example: Suppose you have a container, which contains a PostgreSQL database. If you start a container based on the Docker image for the first time, it will be empty.
Next, you use SQL-statements to create a new table users representing the users of an application.
Finally, you insert two users.
If you run a simple select-statement, which returns all rows of the table, you will get back the two users.
Now, you stop and remove the container and create a new one. The data from the database in the former container will be lost. To persist data, we need to utilise volumes.
You can think of volumes as a kind of mount point. Namely, there exists a certain piece of memory outside of the container on the Docker host, where the data will be persisted. When the container is removed, the data is not lost as it is stored on the Docker host. If a new container is started and it uses the very same volume, the data will still be there.
Alright, that was enough theory for the moment. Let's get our hands dirty and see Docker in action!
Containerising a Flask-Application
In this scenario, we will containerise a Flask application. Flask is a popular Python micro web framework and in this section, we will first implement a basic Flask application. Subsequently, we create a basic Dockerfile and go through the steps to finally run the application on our host machine. Furthermore, we will have a look at the production-ready Dockerfile for shipping Flask applications.
Sample Application
In your working directory, open a terminal, create a directory called flask-example and navigate into it:
$ mkdir flask-example
$ cd flask-example
Next, we will create a virtual environment, activate it, and install the only dependency: Flask. In my case, I am using Python 3.9.1+:
$ python --version --version
Python 3.9.1+ (default, Dec 27 2020, 09:05:01)
[GCC 9.3.0]
$ python -m venv .venv
$ source .venv/bin/activate
$ python -m pip install flask
Currently, we are in our project directory.
Let's create another directory app, which serves as application directory.
This way, we separate project files, such as Dockerfile, .gitignore, and the like from the actual application.
$ mkdir app
Our Flask application is going to be a very basic one.
Therefore, we will only have a single file main.py, which we will put into the app directory,
$ touch app/main.py
Let's have a look at main.py:
from flask import Flask
from flask.templating import render_template_string

app = Flask(__name__)


@app.route("/")
def home():
    return render_template_string("Hello World")


@app.route("/contact")
def contact():
    return render_template_string("This might be a contact page in the future.")


if __name__ == "__main__":
    app.run(host="0.0.0.0", port=5000, debug=True)
I do not want to go into great detail, because this article is not about Flask itself.
In essence, a new Flask application app is defined.
Furthermore, two separate functions are created serving as views.
For the sake of simplicity, both return strings.
Last but not least, we will run the Flask development server if the file main.py is run directly via command line.
Info
It is important that you use 0.0.0.0 as host.
Otherwise, the application will not be accessible from outside the container!
You can start the Flask application as follows:
$ python app/main.py
Go to your browser and visit http://0.0.0.0:5000. The string "Hello World" should be displayed. Additionally, go to http://0.0.0.0:5000/contact and the other string is shown.
Great, we built our simple Flask application!
You can stop the development server by going back to your terminal and pressing Ctrl+C.
Before we can move on, we need to save our dependencies in a requirements.txt, which we will use later to tell Docker, which dependencies to install.
Therefore, run the following command in your terminal session:
$ python -m pip freeze > requirements.txt
We are all set. Next, we will containerise our Flask application!
Creating the Dockerfile
First, create a file called Dockerfile in your project directory.
$ touch Dockerfile
Next, paste the following code into it. Do not worry, we will go over it step-by-step.
FROM python:3.9

EXPOSE 5000

RUN mkdir /app
WORKDIR /app

COPY requirements.txt requirements.txt
RUN pip install -r requirements.txt

COPY app/ .

CMD [ "python", "main.py" ]
First, we specify the base image we want to use. In this case, it is the official Python base image. We use version 3.9 here because our application was written for Python 3.9. Next, we expose port 5000. Our Flask application is accessible on port 5000. To make it accessible from outside the container, we need to expose the port. Later, we will map the port to a different host port, so we can access it from our host machine.
The subsequent two lines of the Dockerfile create a new directory called app and set it as working directory.
So, whenever we specify a relative path, it is relative to our working directory.
Next, we copy the requirements.txt into the image and install the dependencies specified in it.
Subsequently, the application files - here it is only the main.py file - are copied into the image.
Last but not least, the command, which is executed when a container is spawned, is specified.
In this scenario, we want to run the Flask development server as we did on our local machine.
Awesome, we created our first Dockerfile! Let's move on and run our application.
From Dockerfile to Container
To get a running container, we need to build a Docker image based on our Dockerfile first.
Therefore, we run the build command:
$ docker image build -t example .
Notice, that we supply the -t option, which allows us to specify the tag or name of the Docker image.
For the sake of simplicity, we name it example.
The . refers to the build directory.
Here, Docker finds the Dockerfile and based on this directory, files are copied into the image.
With the image being built, we can now create a running instance of it. The command is as follows:
$ docker container run -itd --rm --name example -p 5000:5000 example
The run command gets a single positional argument - the image name.
In our case, this is example.
Furthermore, we supply a few options:
-
-itdallows us to interact with the container properly. Furthermore, it is started in detached mode, so it is running in the background. -
--rmmeans that the container is also removed after we stop it. -
--name examplegives the container the nameexample. Otherwise, a random name will be chosen. -
-p 5000:5000maps the host machine's port 5000 to the container's port 5000 (remember that we exposed port 5000?).
Congratulations, you started your first container! You can go to your browser and open http://0.0.0.0:5000 to access the Flask application. To stop the container, simply run:
$ docker container stop example
Production-Ready Dockerfile
Although we created a Dockerfile, which allows us creating an image and spawning containers running the actual application, this is not a production-ready setup. In the previous scenario, we used Flask's built-in development server. This server is very good for development purposes as it removes the burden of setting up a real WSGI-server. However, it is not meant to be used in production for various reasons, which we will not cover at this point.
Therefore, we will create a much more reliable Dockerfile.
Create a new file called Dockerfile_prod in your project-directory.
This Dockerfile will be used to build the image used in production.
$ touch Dockerfile_prod
Next, copy and paste the following lines into it:
FROM tiangolo/meinheld-gunicorn-flask:python3.8-alpine3.11

WORKDIR /app

RUN python -m pip install --upgrade pip

COPY requirements.txt requirements.txt
RUN pip install -r requirements.txt

COPY app/ .
The first improvement is that we use a base image, which was created to run Flask applications in production. It uses gunicorn as WSGI-server and comes with Flask pre-installed. Furthermore, it is based on Alpine Linux. It is a very small Linux distribution, which results in smaller Docker images.
Note
At the time this article was written, the latest supported Python version by this Docker image was 3.8. In our case, it is not a problem, because our code runs on both, Python 3.8 and 3.9.
Next, we set the working directory to /app.
We do not need to create this directory in advance as it already exists in the base image.
Subsequently, pip is upgraded to ensure we use the latest version available.
Furthermore, we copy the requirements.txt into the image and install the specified dependencies.
Last but not least, the remaining code files - in our case only the main.py file - are copied.
And that's it! You can build an improved image and run a container based on it as follows:
$ docker image build -t example .
$ docker container run -itd --rm --name example -p 5000:80 example
Note
The base image exposes port 80 and the Flask application is available under port 80. Therefore, we need to map port 80 instead of 5000 to the host's port 5000 to access the application from outside the container.
Summary
Congratulations, you have made it through the article! In this article, you learnt the basic concept of a container and how it differs from a virtual machine. Furthermore, you had a look at the most important Docker components and understood how to work with them. Last but not least, you containerised a Flask application, which can now be shipped within a Docker container!
I hope you enjoyed reading the article and learnt something useful. Make sure to share it with your friends and colleagues! Do you have feedback? I am eager to hear! You can use the comment function below, contact me via Twitter, where I am @DahlitzF or via the contact form.